CRUD
- Create (INSERT)
- Read (SELECT)
- Update (UPDATE)
- Delete (DELETE)
Create 구현
필요한 것
- DB 테이블 생성(Domain → maven compile)
- 필요한 정보를 가져다 줄 filter
- View와 Controller(edit화면과 해당 뷰를 띄워줄 controller)
- view와 controller를 연결할 repository, service
/java/com.OOOO/domain 폴더 아래에 본인이 만들고 싶은 domain 생성
❗ 나는 Project 도메인을 기준으로 잡았다. ❗
@Getter
@Setter
@Entity
@Table(name = "project", indexes = {})
@NoArgsConstructor
@AllArgsConstructor
@EqualsAndHashCode(onlyExplicitlyIncluded = true)
public class Project {
  //기본정보
  @Id
  @GeneratedValue(strategy = GenerationType.IDENTITY)
  @EqualsAndHashCode.Include
  private Integer id;

  @JsonIgnore
  @DateTimeFormat(pattern = DateUtil.PATTERN_YMDHMS)
  @Column(nullable = false, insertable = false, updatable = false, columnDefinition = "timestamp(6) default current_timestamp(6)")
  private LocalDateTime createDate;   //생성일시

  @JsonIgnore
  @DateTimeFormat(pattern = DateUtil.PATTERN_YMDHMS)
  @Column(nullable = false, insertable = false, updatable = false, columnDefinition = "timestamp(6) default current_timestamp(6) on update current_timestamp(6)")
  private LocalDateTime updateDate;   //변경일시

  //추가정보
  @Column(nullable = false, length = 255)
  private String date; //프로젝트 진행날짜

  @Column(nullable = false)
  private String title; // 프로젝트 제목

  private String purpose; // 프로젝트 목적

  private String technology; // 프로젝트 사용기술

  private String address; // 프로젝트 깃헙주소

}
DB table에서 가져올 내용들을 filter로 가져온다. (/java/com.OOOO/filter)
❗ 나중에 filter를 통해 pageable 사용할 예정 ❗
@Getter
@Setter
@NoArgsConstructor
@AllArgsConstructor
public class ProjectFilter {

  private String title;
  private String date;
  private String purpose;
  private String technology;
  private String address;
}
View 화면 생성(/resources/templates)
❗ 아래 코드는 현재 내가 진행하고 있는 프로젝트 코드이므로 그냥 바로 적용하면 깨질 것임. 따라서 알맞게 맞춰서 바꾸어줘야 함! ❗
<!DOCTYPE HTML>
<html lang="ko" xmlns:th="http://www.thymeleaf.org">

<head>
  <th:block th:replace="fragments/head :: head"></th:block>
  <link rel="stylesheet" th:href="@{/static/assets/css/project-edit.css}" type="text/css"/>
  <style>
    h2 {
      font-weight: bold;
      margin-bottom: 20px;
    }
  </style>
</head>

<body class="is-preload">
<div id="wrapper">
  <th:block th:replace="fragments/top :: top"></th:block>
  <div id="main">
    <article id="work" class="panel">
      <h2>Project ADD</h2>
      <form method="post"
            th:action="|@{/project/save}|" th:object="${project}">
        <input th:field="*{id}" type="hidden"/>
        <button class="saveButton" type="submit" th:text="|save|"></button>
        <div class="mb-3">
          <label class="form-label" for="date">Progress Date</label>
          <input type="text" class="form-control" name="date" id="date" th:field="*{date}"
                 placeholder="프로젝트 진행 날짜를 입력해 주세요">
        </div>
        <div class="mb-3">
          <label class="form-label" for="title">Project Title</label>
          <input type="text" class="form-control" name="title" id="title" th:field="*{title}"
                 placeholder="프로젝트 제목을 입력해 주세요">
        </div>
        <div class="mb-3">
          <label class="form-label" for="purpose">Project Purpose</label>
          <input type="text" class="form-control" name="purpose" id="purpose" th:field="*{purpose}"
                 placeholder="프로젝트 목적을 입력해 주세요">
        </div>
        <div class="mb-3">
          <label class="form-label" for="content">Used Technology</label>
          <textarea class="form-control" rows="5" name="content" id="content"
                    th:field="*{technology}"
                    placeholder="사용한 기술을 입력해 주세요"></textarea>
        </div>
        <div class="mb-3">
          <label class="form-label" for="address">Github Address</label>
          <input type="text" class="form-control" name="address" id="address" th:field="*{address}"
                 placeholder="Github 주소를 입력해 주세요">
        </div>
      </form>
    </article>
  </div>
</div>
<th:block th:replace="fragments/footer :: footer"></th:block>
<th:block th:replace="fragments/common-script :: common-script"/>
</body>
</html>
이제 view와 연결 지을 controller 구현(/java/com.OOOO/controller)
❗ edit화면을 띄울 것과 적은 내용을 save 해서 DB에 저장이 되어야 함 ❗
@Controller
@RequiredArgsConstructor
@RequestMapping("/project")
public class ProjectController {

 @NonNull
  private final ProjectService projectService;

   @GetMapping({"/edit", "/edit/{id}"})
  public String edit(@PathVariable(required = false) Integer id, Model model) {

    Project project = (id == null) ? new Project() : projectService.findById(id).orElseThrow(
        DataNotFoundException::new);

    model.addAttribute("project", project);

    return "project/edit";
  }

   @PostMapping("/save")
  public String save(@ModelAttribute("project") Project project, BindingResult result, Model model,
      RedirectAttributes redirectAttr) {

    if (!result.hasErrors()) {
      projectService.save(project);
      redirectAttr.addFlashAttribute("message", "저장되었습니다.");
      return "redirect:/project/edit/" + project.getId();
    }
    model.addAttribute("project", project);
    return "project/edit";
  }

}
controller 안에 써있는 함수들을 구현해줘야 함!
제일 먼저 Repository 생성(/java/com.OOOO/repository)
@Repository
public interface ProjectRepository extends JpaRepository<Project, Integer>,
    CustomProjectRepository {
}
다음으론 customRepository 생성(/java/com.OOOO/repository/custom)
❗ findAllByFilter : filter를 통해 페이지를 구성할 계획 / 이것은 list를 뽑아낼 때 필요한 것 ❗
@NoRepositoryBean
public interface CustomProjectRepository {

  Page<Project> findAllByFilter(Pageable pageable, ProjectFilter filter);

}
마지막으론 RepositoryImpl 생성(/java/com.OOOO/repository/support)
❗ querydsl사용으로 코드로 db 코드를 만질 수 있다! ❗
public class ProjectRepositoryImpl extends QuerydslRepositorySupport implements
    CustomProjectRepository {

  private final QProject project = QProject.project;

  public ProjectRepositoryImpl() { super(Project.class); }

  @Override
  public Page<Project> findAllByFilter(Pageable pageable, ProjectFilter filter) {
    BooleanBuilder builder = new BooleanBuilder();

    if (!StringUtils.isBlank(filter.getDate())) {
      builder.and(project.date.containsIgnoreCase(filter.getDate()));
    }
    if (!StringUtils.isBlank(filter.getTitle())) {
      builder.and(project.title.containsIgnoreCase(filter.getTitle()));
    }
    if(!StringUtils.isBlank(filter.getAddress())){
      builder.and(project.address.containsIgnoreCase(filter.getAddress()));
    }
    if(!StringUtils.isBlank(filter.getTechnology())){
      builder.and(project.technology.containsIgnoreCase(filter.getTechnology()));
    }
    if(!StringUtils.isBlank(filter.getAddress())){
      builder.and(project.purpose.containsIgnoreCase(filter.getPurpose()));
    }

    final JPQLQuery<Project> query = from(project).where(builder);

    List<Project> result = getQuerydsl().applyPagination(pageable, query).fetch();

    return new PageImpl<>(result,pageable,query.fetchCount());

  }

}
repository 구성이 끝났다면 이를 controller에 가져다 사용할 수 있게 service를 구현(/java/com.OOOO/repository/service)
@Service
@RequiredArgsConstructor
public class ProjectService {

  @NonNull
  private final ProjectRepository projectRepository;

  public Optional<Project> findById(Integer id) { return projectRepository.findById(id); }

  public Page<Project> findAllByFilter(Pageable pageable, ProjectFilter filter) {
    return projectRepository.findAllByFilter(pageable, filter);
  }

  public Project save(Project project) {
    return projectRepository.save(project);
  }
}
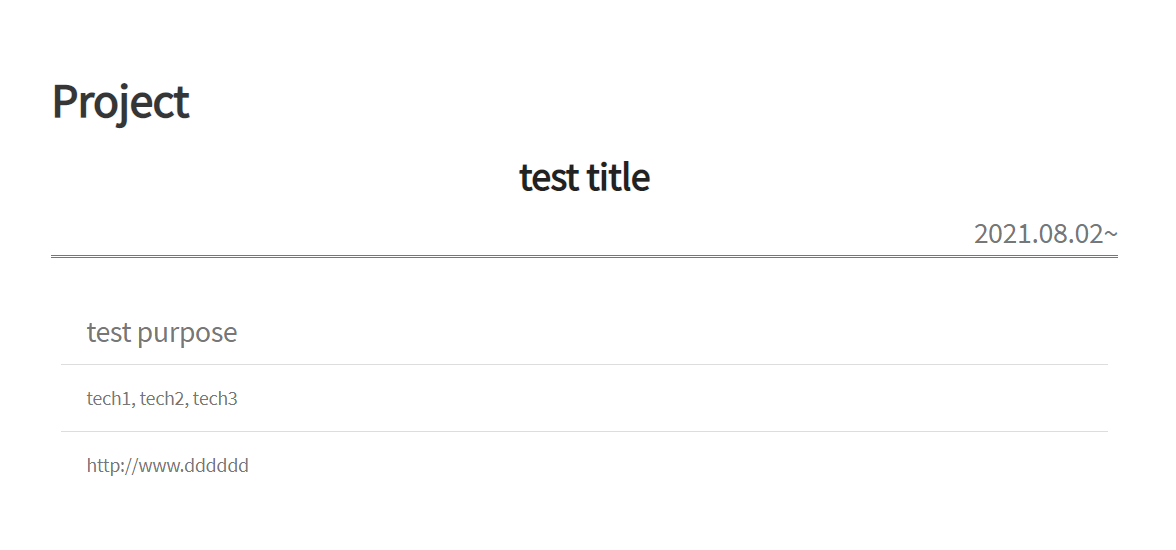
현재까지 진행하면 나오는 결과
 edit 화면
save 버튼을 누르면
 DB 결과
DB 결과
DB에 저장이 됨을 확인할 수 있다.
❗ 혼자 진행 중인 프로젝트를 가져온 거라 아마 본인에 맞게 고쳐야 할 부분이 많을 것이다! 그래도 저 순서대로 하면 글 작성과 저장까지는 구현하는데 도움이 될지도...? 다음 포스팅은 R에 관해 구현할 예정 ❗