(참고: https://iot-sitewise.workshop.aws/en/introduction/what-you-are-going-to-build.html)
CloudFormation 스택 생성 (도쿄)
- Cloud9 환경
- SageMaker 노트북 인스턴스 등..
SiteWise gateway가 AWS IoT Greengrass에서 실행되고 Greengrass는 AWS IoT Core에 연결한다.
(IoT Core의 Rule Engine으로 데이터를 수집할 예정!)
→ 실습의 흐름 맛보기 랄까...
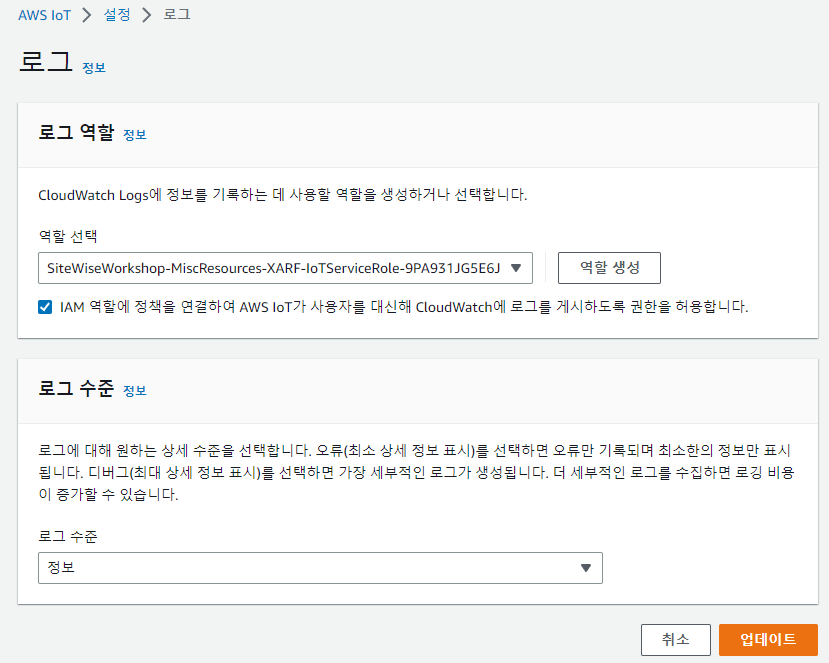
IoT에 대한 로깅 활성화
- IoT 서비스가 계정의 CW에 쓸 수 있도록 허용하려면 서비스 역할이 필요하다.
- CloudFormation 콘솔 상 IoT ServiceRoleName 출력 세션에서 역할 이름 확인 가능하다.

AWS IoT SiteWise 설정
- 자신의 속성이 데이터 스트림과 일치하는 경우에만 데이터가 SiteWise로 수집된다.
- 데이터 수집 방법
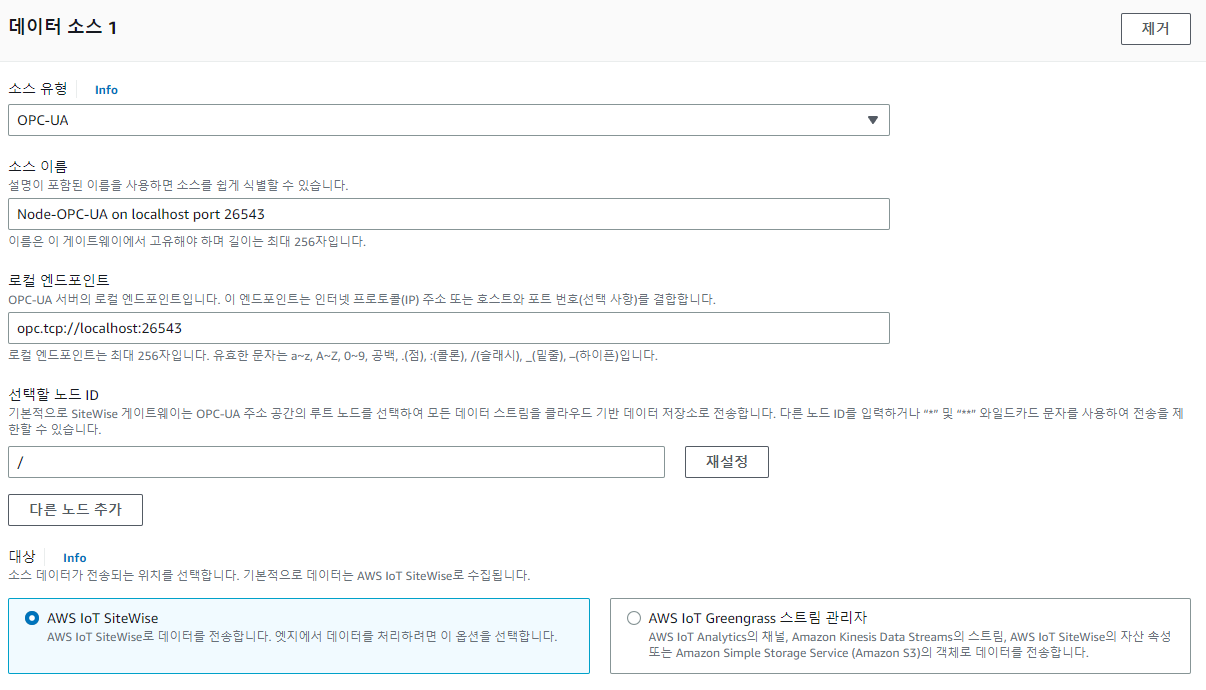
- OPC-UA 서버에 연결하고 이러한 서버에서 데이터를 검색하는 SiteWise 게이트웨이를 통해
- AWS IoT Core의 MQTT 항목에 메시지를 게시하고 AWS IoT 규칙을 사용하여 데이터를 AWS IoT SiteWise로
- BatchPutAssetPropertyValue API를 사용하여 SiteWise로 직접
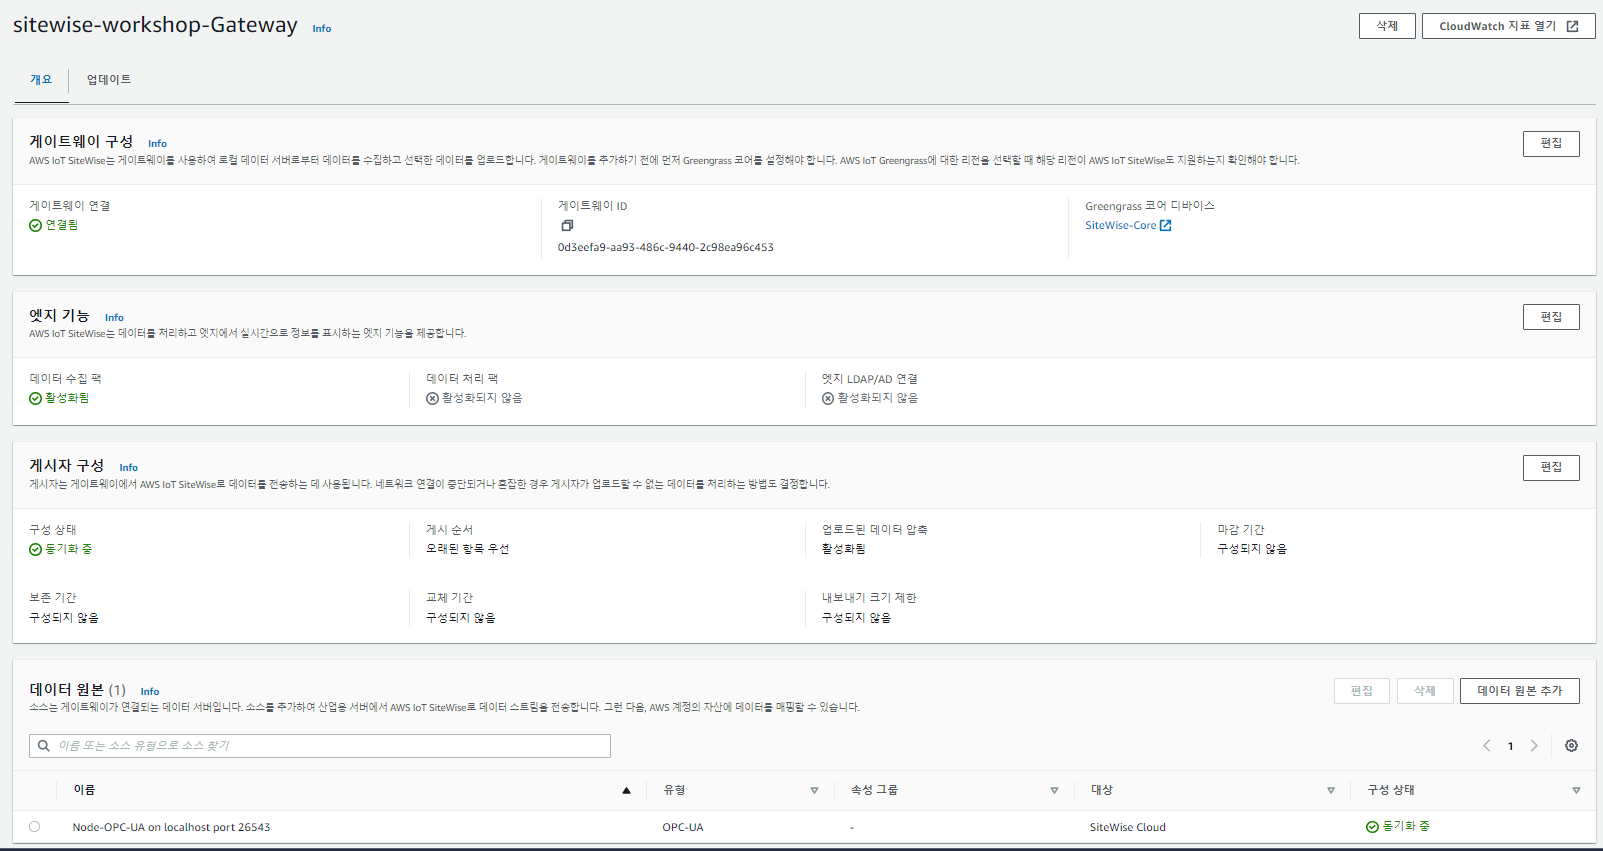
먼저 SiteWise gw를 만들자.
(Greengrass 구성 요소로 게이트웨이가 실행된다.)
(data collection pack: 데이터를 수집하고 클라우드로, data processing pack: 게이트웨이가 에지에서 데이터 처리)
진행할 실습 상에서 게이트웨이는 cloud9 환경이다.

엣지 기능에서 데이터 처리팩은 비활성화!
게시자 구성의 경우는 디폴트
승인을 누르면 설치 파일이 PC에 다운로드 된다.
다운로드된 파일을 cloud9으로 업로드 한다. (/home/ec2-user/sitewise/)
cd ~/sitewise
chmod +x sitewise-workshop-Gateway.deploy.sh
sudo ./sitewise-workshop-Gateway.deploy.sh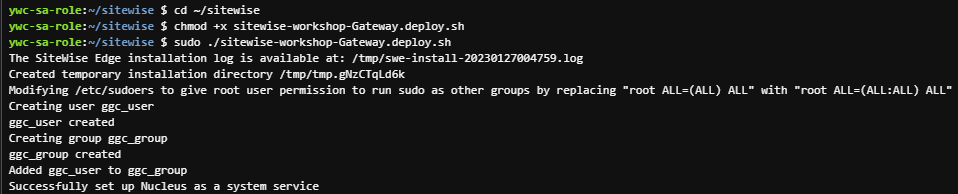
# greengrass 상태 확인
systemctl status greengrass.service

# greengrass process 실행 확인
ps aux |grep green

# 로그 파일
sudo su -
cd /greengrass/v2/logs/- 로그 확인
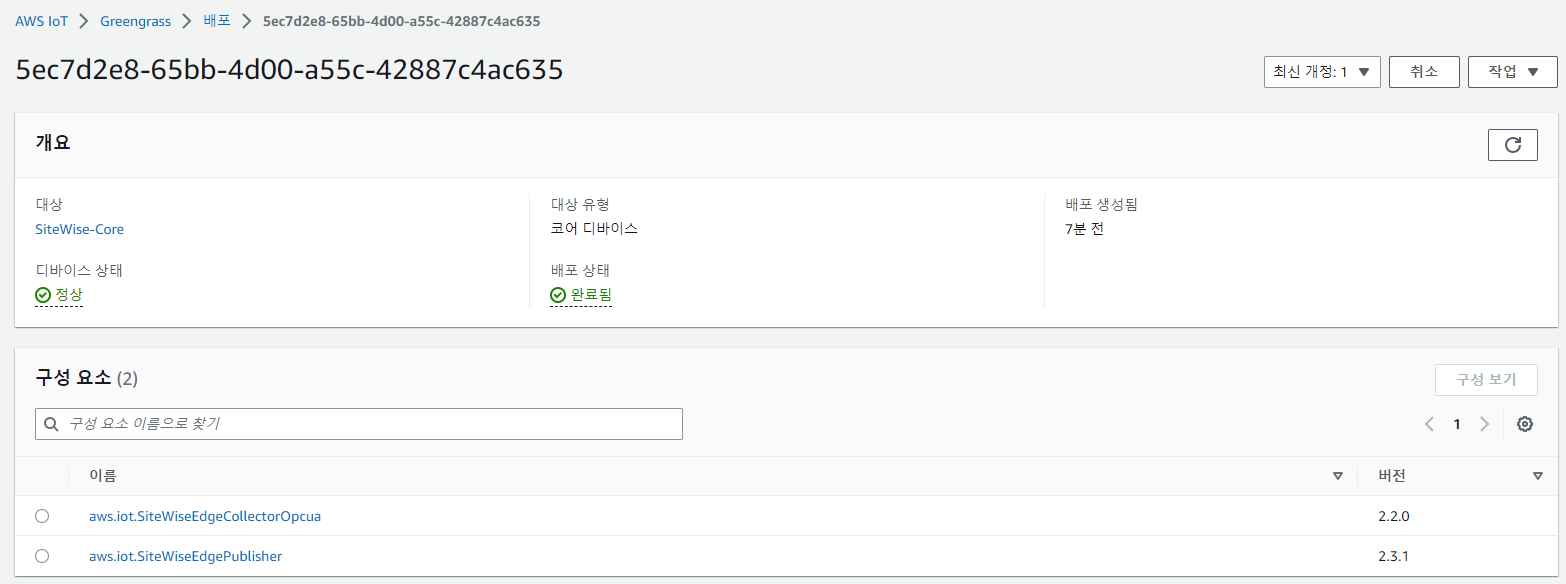
- greengrass.log : AWS IoT Greengrass에 대한 로그
- aws.iot.SiteWiseEdgeCollectorOpcua.log : OPC-UA 서버에서 데이터를 수집하는 SiteWise 구성 요소
- aws.iot.SiteWiseEdgePublisher.log : 클라우드의 SiteWise 데이터 저장소로 데이터를 전송하는 SiteWise 구성 요소
OPC-UA 서버 시작을 해보자.
cd ~/sitewise/
./start-node-opcua.sh
- OPC-UA 서버가 SiteWise 데이터 수집기(aws.iot.SiteWiseEdgeCollectorOpcua) 에서 연결을 수신했다.
- 수집기의 경우 OPC-UA 서버에서 데이터를 검색하여 스트림에 기록한다.
- SiteWise Publisher는 이 스트림을 읽고 데이터를 AWS cloud의 AWS IoT SiteWise로 전달한다.
AWS IoT SiteWise 데이터 수집
- SiteWise는 데이터를 소비하고 데이터 스트림을 자산 속성에 일치 시킨다.
- 자산 모델 및 자산을 생성하고 데이터 스트림을 자산 속성과 연결한다.
먼저 AWS IoT SiteWise 데이터 스토리지를 확인해보자.
aws iotsitewise describe-storage-configuration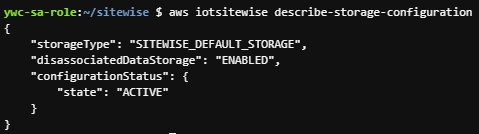
연결 해제된 데이터 저장소가 활성화 되면 위의 출력이 뜬다. → disassociated mode
(데이터 저장소가 설정된 모드는 데이터 스트림을 자산 속성과 연결하는 방식에 영향을 준다.)
데이터 수집의 경우 (실습 기준)
- Generators 1 and 2: through a SiteWise gateway
- Generators 3 and 4: through the SiteWise PUT API
- Generators 7 and 8: by using AWS IoT’s rules engine
[자산 모델링]
SiteWise 자산을 사용해 산업 운영의 가상 표현을 생성할 수 있다.
(자산: 디바이스, 장비 또는 하나 이상의 데이터 스트림을 IoT SiteWise로 보내는 프로세스)
실습의 예로 /DayOneEnergyCorp/1/Generator/Power 의 경우 1번 발전기에서 생성된 에너지 측정값이다.
(측정값을 기반으로 메트릭 생성 가능)
Asset model → Asset → Asset property
[Generator 표현]
(실습: 각 발전기는 분당 생산된 에너지와 발전기의 내부 온도를 보고, 분당 20와트의 에너지 생산 예상)
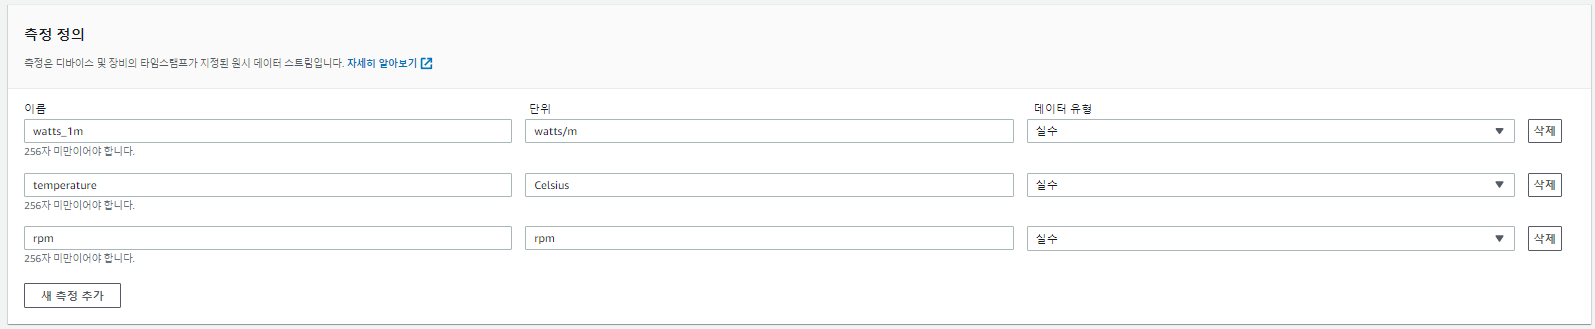
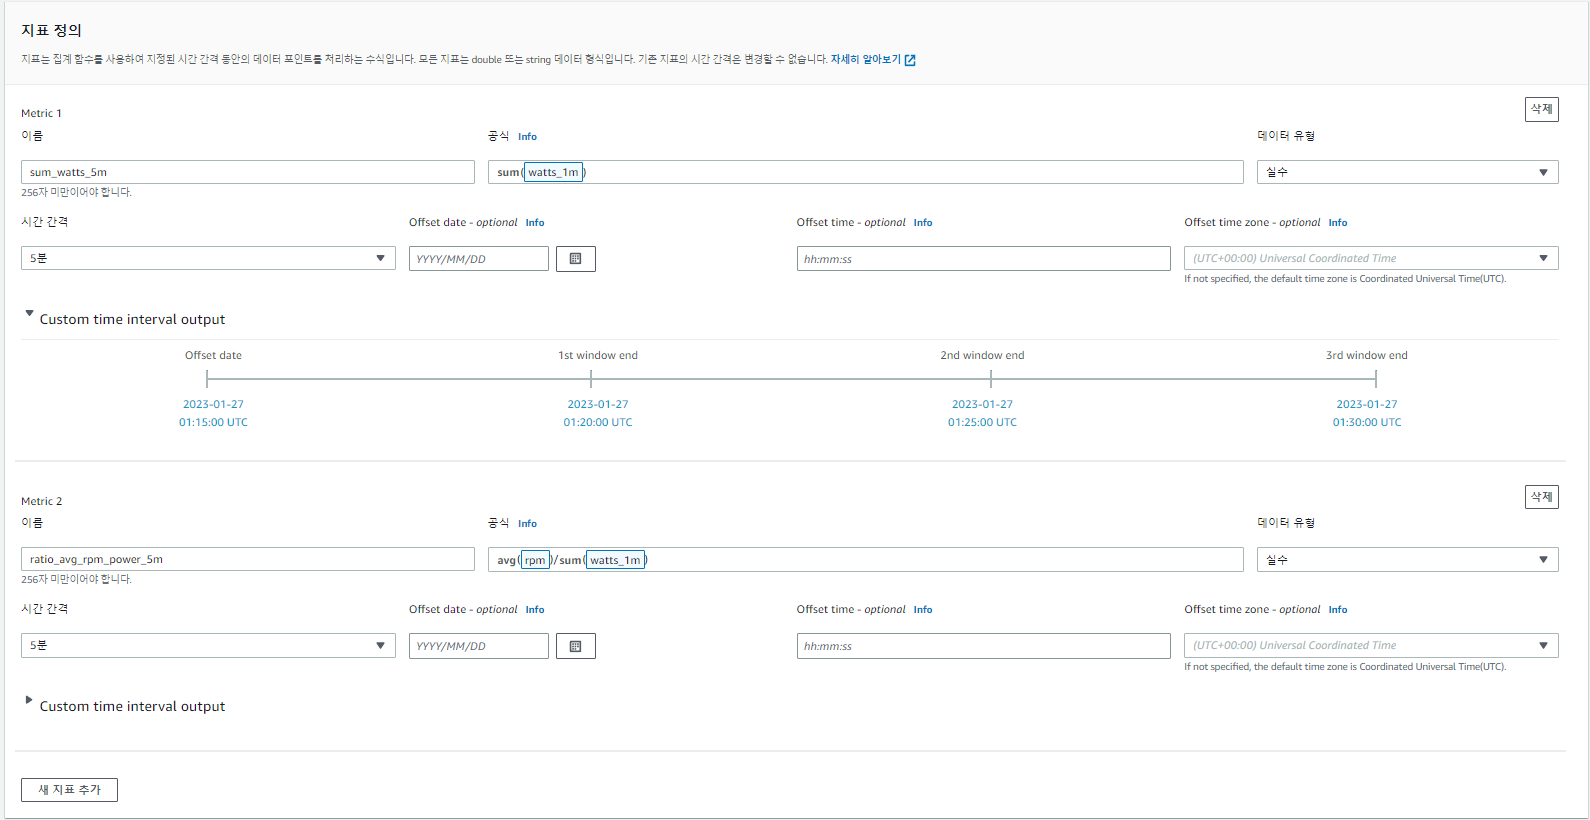
생성기 템플릿에서 아래의 측정 및 지표 정의할 예정!
- 측정: 생산된 분당 와트, 온도 및 rpm
- 지표: 5분당 총 와트, 5분당 평균 온도 및 5분당 평균 rpm
자산 모델(Asset model)을 생성해보자.
자산의 경우 템플릿을 기반으로 생성된다.(정보의 일관성 보장)
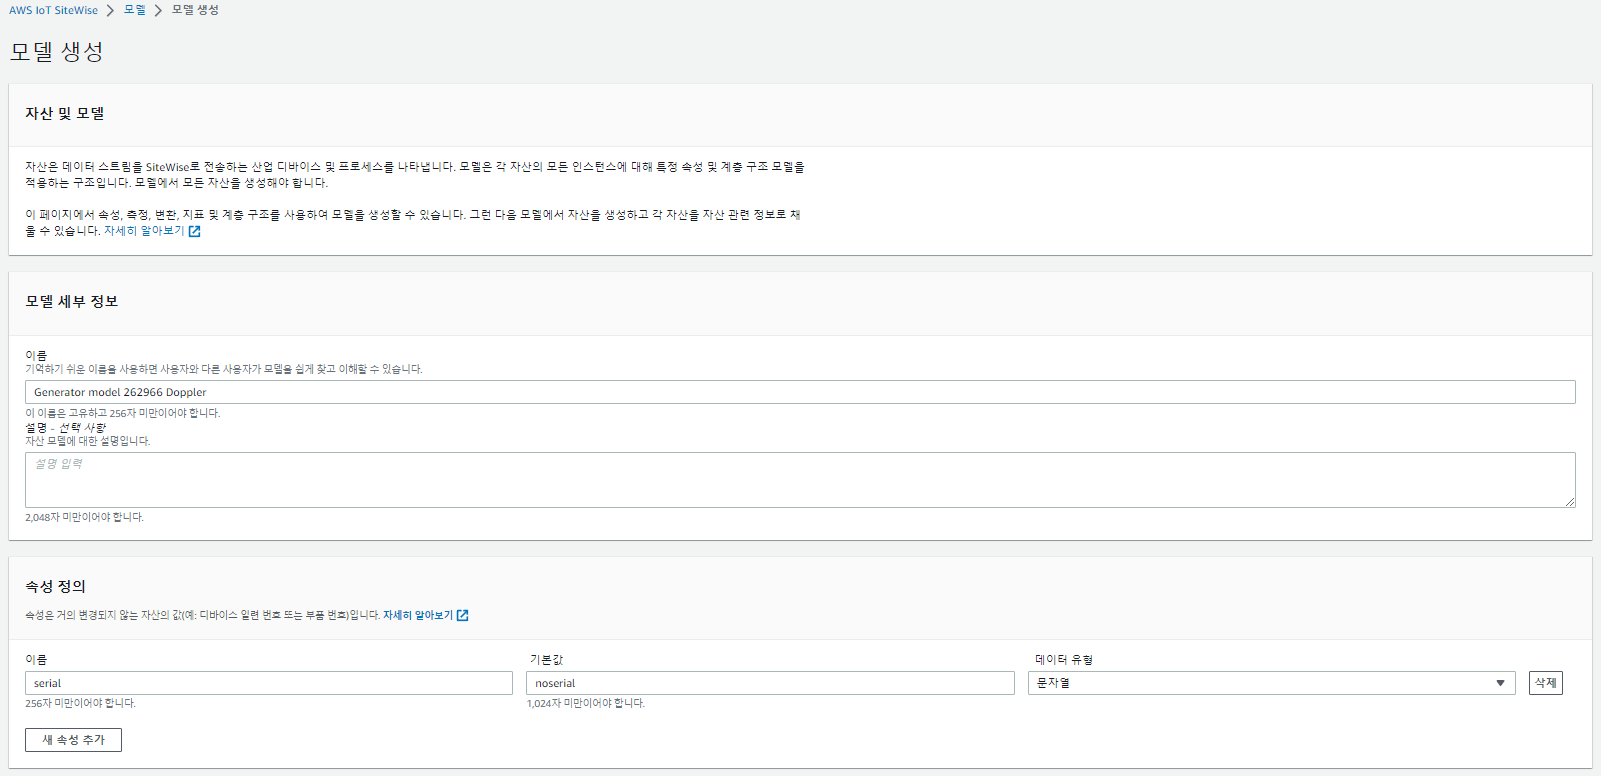
위 이미지와 같이 모델을 생성한다. (상태가 active 될 때 까지 기다리기!)
자산(Asset)을 만들어 보자.
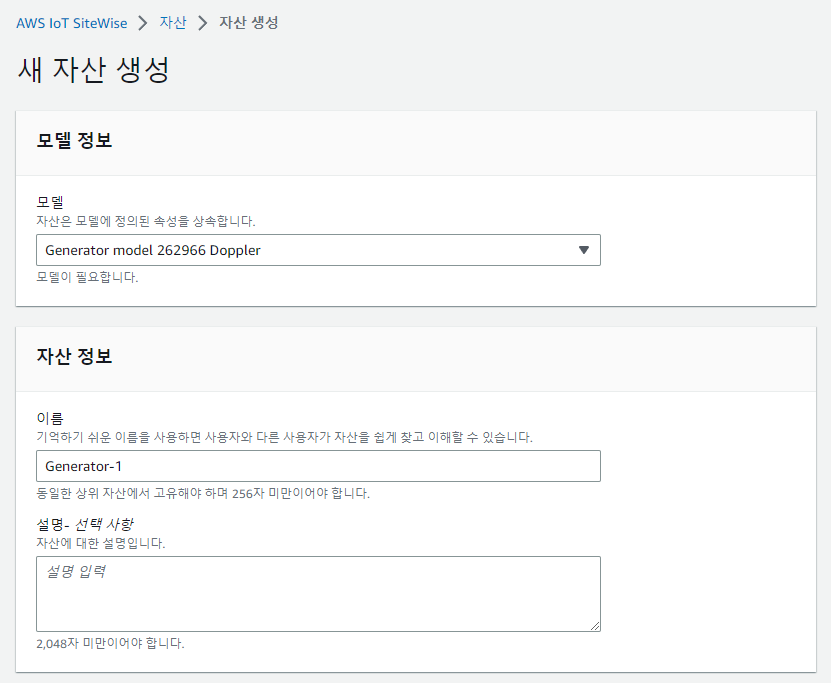
얘도 상태가 active 확인이 되어야 한다.
데이터 스트림 연결 및 알림을 구성해보자.
(자산이 생성된 뒤 SiteWise에 수집되는 데이터 스트림을 자산 속성과 연결하는 과정이 필요하다.)
SiteWise가 IoT에 데이터를 게시하도록 하려면 관련 속성에 대한 알림을 활성화 해야한다.
나의 경우 연결 해제 모드 인 것을 위에서 확인했다.
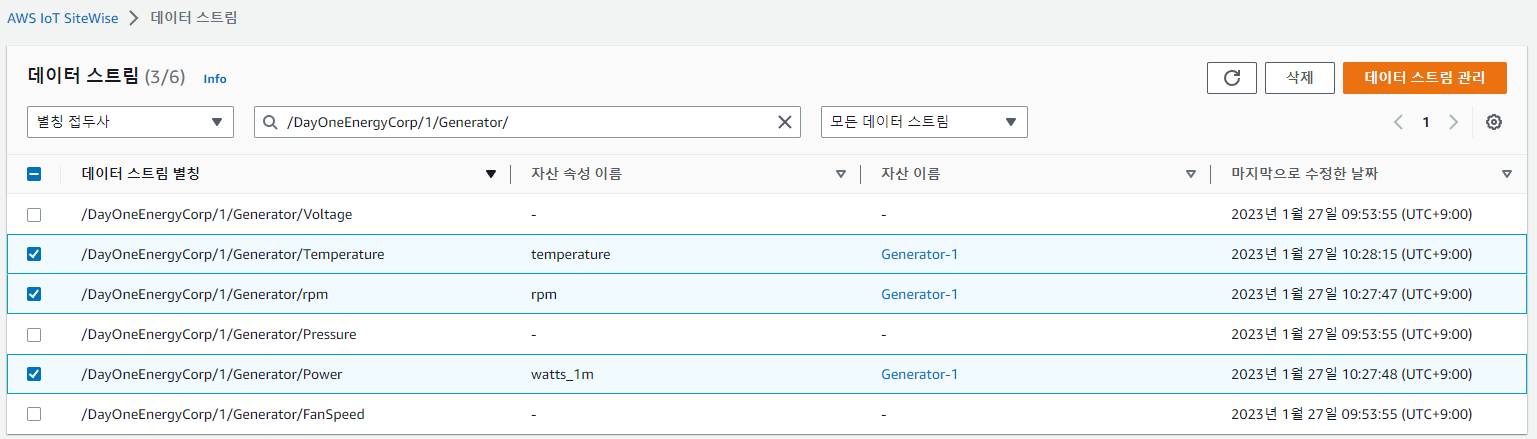
데이터 스트림 관리를 통해 속성을 선택해 업데이트 한다.
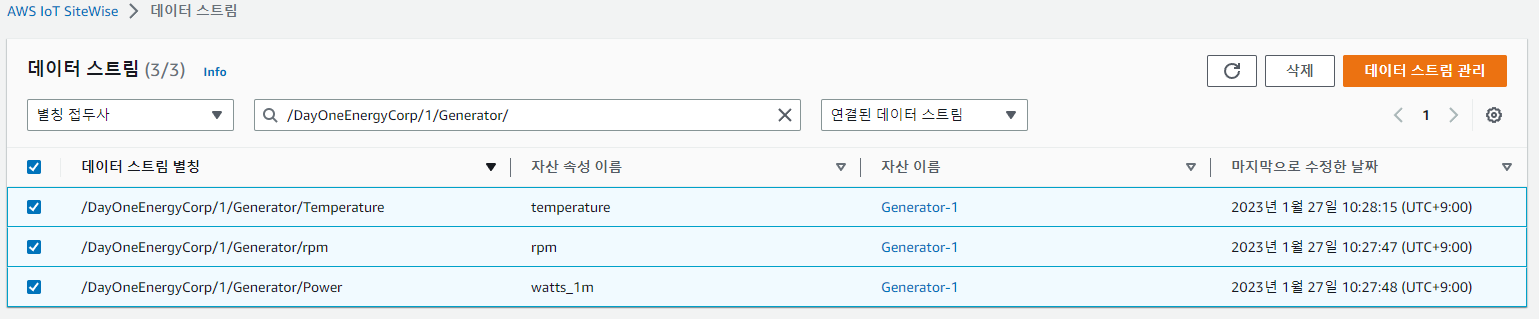
위와 같이 데이터 스트림이 Generator-1(자산)의 속성과 연결된 것을 확인할 수 있다.
자산에 들어가 Generator-1의 모든 측정 및 지표에 대한 MQTT 알림 상태를 ENABLED로 설정

데이터 플로우를 확인해보자.
(SiteWise 게이트웨이는 OPC-UA 서버에서 스트림을 가져와 SiteWise에 업로드해야 한다.
3개의 데이터 스트림이 자산(Generator-1)에 연결된다. 알림이 활성화되어 있기에 IoT Core에 게시된다.)
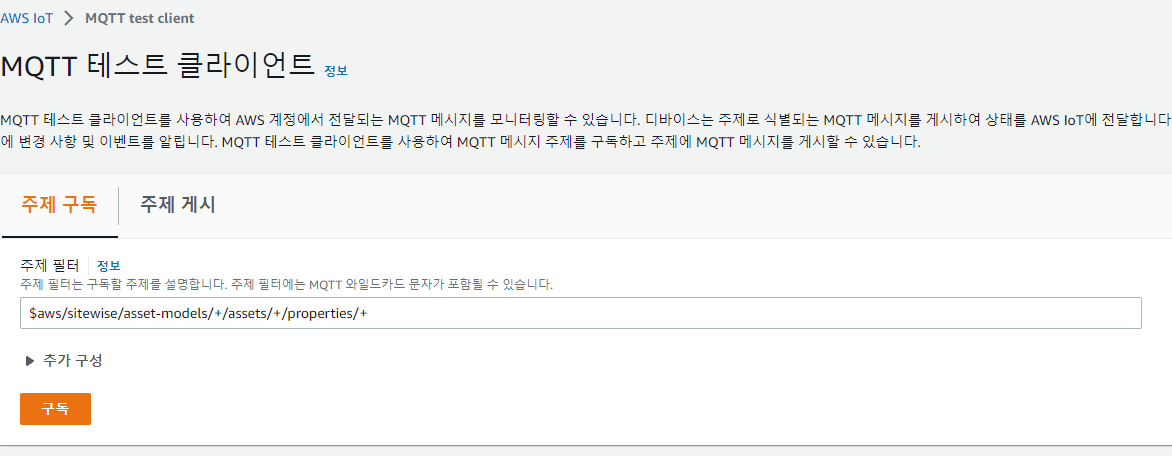
SiteWise는 알림의 데이터를 토픽에 게시한다.
$aws/sitewise/asset-models/+/assets/+/properties/+
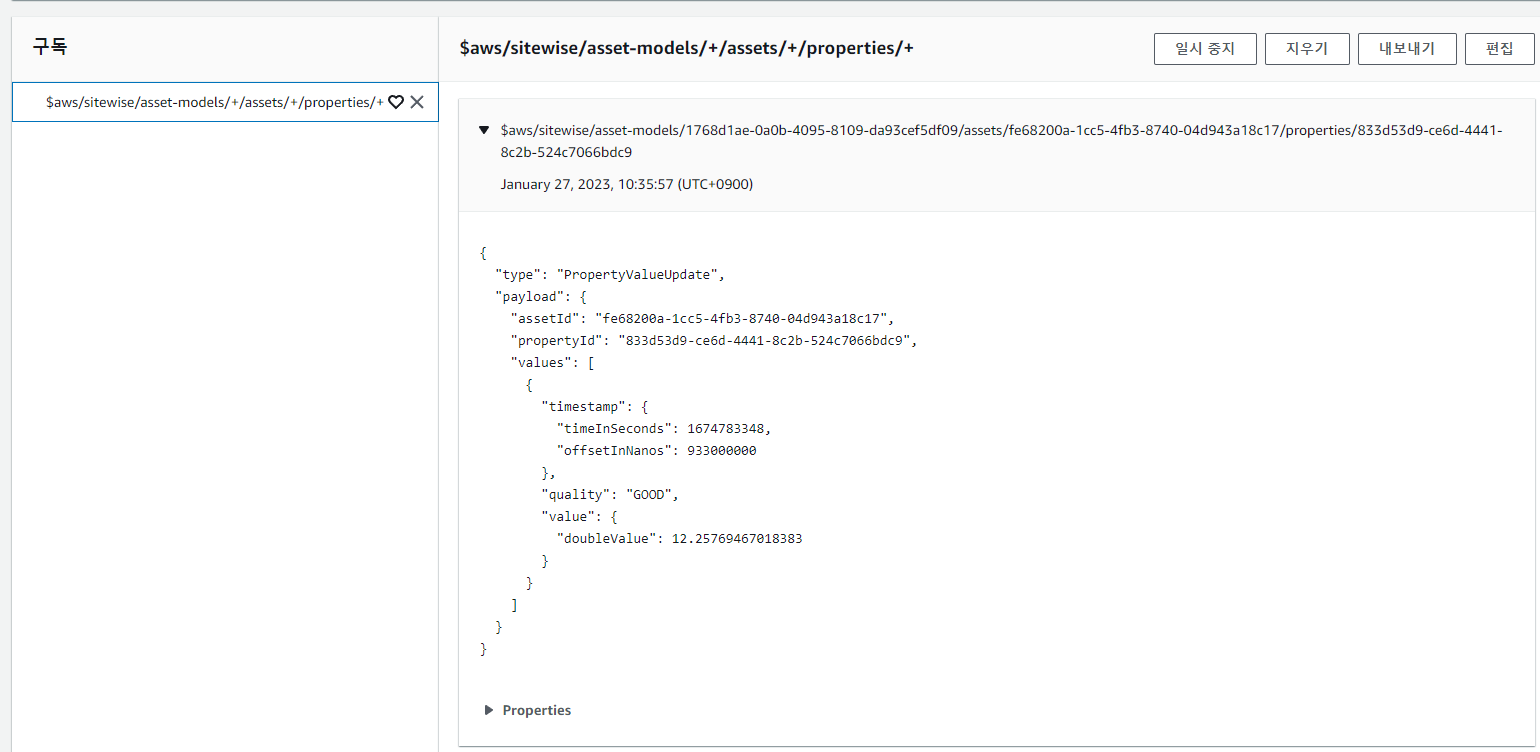
아니면 자산에서 측정 및 지표에서 최신값에 값이 표시가 되어야 한다!
데이터 생성기를 시작하려면,
# AWS IoT Core로 수집 시작
cd ~/sitewise
./sitewise-iot-ingest.py

# AWS IoT SiteWise로 수집 시작
cd ~/sitewise
./sitewise-direct-ingest.py
(추가 자산을 만들어 더 많은 데이터를 수집하려면 Generator-2는 SiteWise gw, Genterator-3는 PUT API, Generator-7은 IoT Core Rule Engine을 통해 수집된다.)
대충 이런 흐름이다...(어렵다😥)
AWS IoT SiteWise Monitor
이제 마지막으로 모니터링을 할 수 있는 환경을 만들어보자.
자산의 데이터를 모니터링하려면 포털을 생성한 뒤 프로젝트와 대시보드를 만든다.
(AWS 계정 없이도 포털을 다른 사용자와 공유가 가능하다.)
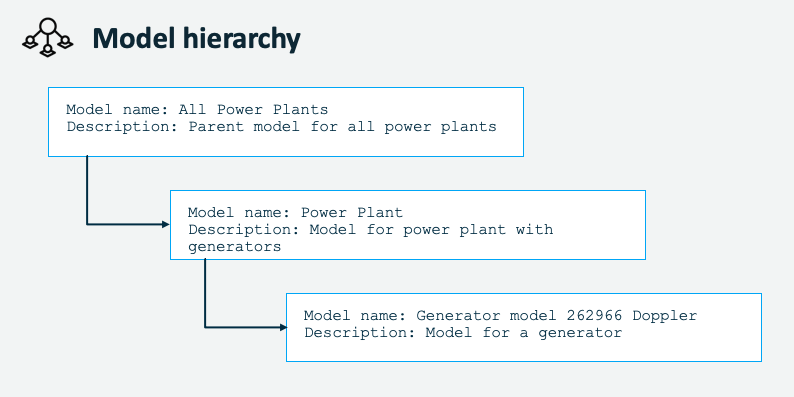
계층 구조를 위한 자산 모델 생성 가이드
CREATE POWER PLANT ASSET MODEL
- Name: Power Plant
- Attribute definitions
- Name: location, Default value: {"lat": "none", "lon": "none"}, Data type: String
- Hierarchy definitions
- Hierarchy name: Power_Plants-Generators-Hierarchy
- Hierarchy model: Generator model 262966 Doppler
- Metric definitions
- Name: power_per_plant_5m
- Formula: sum(Power_Plants-Generators-Hierarchy sum_watts_5m)
- Time interval: 5 minutes
CREATE POWER PLANT ASSET
You will now create a power plant asset and add generator assets to it. The Power Plant 1 will host generators 1 and 2.
- Model: Power Plant
- Name: Power Plant 1
- Wait until the Status becomes ACTIVE
- Edit
- Assets associated to this asset
- Add associated asset
- Hierarchy: Power_Plants-Generators-Hierarchy
- Asset: Generator-1
- Add associated asset
- Hierarchy: Power_Plants-Generators-Hierarchy
- Asset: Generator-2
- Metric: “power_per_plant_5m”: Notification status: ENABLED
- Save asset
Create
- Power Plant 2 with associated asset Generator-3
- Power Plant 3 with associated asset Generator-7
CREATE ASSET MODEL FOR ALL POWER PLANTS
- Name: All Power Plants
- Hierarchy definitions
- Hierarchy name: All_Power_Plants-Power_Plants-Hierarchy
- Hierarchy model: Power Plant
- Metric definitions
- Name: power_all_plants_5m
- Formula: sum(All_Power_Plants-Power_Plants-Hierarchy power_per_plant_5m)
- Time interval: 5 minutes
CREATE AN ASSET FROM THE ALL POWER PLANTS MODEL
When the model is in the status ACTIVE create assets based on this model. Add Power Plant assets.
- Model: All Power Plants
- Name: All Power Plants
After the asset has been created associate each Power Plant asset to All Power Plants
- Edit
- Assets associated to this asset
- Add associated asset
- Hierarchy: All_Power_Plants-Power_Plants-Hierarchy
- Asset: Power Plant 1
- Add associated asset
- Hierarchy: All_Power_Plants-Power_Plants-Hierarchy
- Asset: Power Plant 2
- Add associated asset
- Hierarchy: All_Power_Plants-Power_Plants-Hierarchy
- Asset: Power Plant 3
- “power_all_plants_5m”: Notification status: ENABLED
- Save asset
너무 길어지니까.. 모니터링을 위한 포털 생성의 경우 다음 포스팅에서 진행하도록 하자...
'Cloud > AWS' 카테고리의 다른 글
| [AWS] IoT Device Management - Bulk registration (0) | 2023.10.18 |
|---|---|
| [AWS] Amazon OpenSearch Service 사용해보기 (0) | 2023.08.23 |
| [AWS] AWS IoT Greengrass V2 실습 -2 (0) | 2023.01.26 |
| [AWS] AWS IoT Greengrass V2 실습 (0) | 2023.01.26 |
| [AWS] Firebase를 AWS Amplify로 (0) | 2023.01.04 |